Home Canning for Beginners: All You Need to Get Started
Welcome to Canning 101!
This is a series for beginners who are wondering where to start when it comes to home canning. I am honored you came to me to show you the ropes of preserving your harvest…whether you’ve grown it yourself in your garden, or bought it bulk from the store! Either way, you are going to love canning. Let’s get started.
My Canning Story: How We Came to Preserve Nearly Everything!

I wanted to start off telling you how far I’ve come in my canning and home preservation journey. Mainly to prove to you that if I can do all this, you can too.
It was actually my darling husband who introduced me to canning. He learned as a young boy how to can green beans, salsa, jams, and even how to ferment dilly beans and corn from his Grandma. (I really lucked up, didn’t I?) When we were dating, he showed me how to do green beans and salsa. I knew I must marry him!

Fast forward, we were married and of course, my farmer husband set out our garden at our new home. I was a new wife, that worked a full time job as a nurse, and as badly as I wanted to…we did not can or preserve as much as we could have.
I remember my husband calling his grandma and uncle to ask how to can beets. As far as canning anything besides salsa…I was literally clueless. Lots of veggies, lots of waste…because the only thing I knew to do was freeze it. (And poorly, at that.)
Ok, fast forward one more year, and I am expecting my first little boy. Still not much time or energy to put into canning. I’m beginning to disappoint myself…I remember trying to do salsa with our tomatoes, only to be so sick at my stomach, I didn’t want to fool with it anymore!
The next year, my husband sat me down and we had a discussion.
He really wanted me to learn how to can. I was given the push I needed from our serious talk, and I went out and bought three canning books. I was going to teach myself, by golly, and I would become a canning expert if it killed me.
You all…once I learned the ropes…I became obsessed. And I think you will be too.
This post contains affiliate links. Which means if you choose to shop through my link, I may receive a small commission at no extra cost to you! Thank you for supporting us!
Let’s Start Learning: Canning Basics
In this post, I will be showing you how I learned to can using the WATER BATH METHOD, or the boiling water method.
This is very important to understand first: there are two different types of canning. Water bath canning and pressure canning. We will cover pressure canning later on in a future post. But for now, let’s focus on the gateway drug…water bath canning.
What is the water bath method?
Simply put, the water bath method is where you will put your food into jars and process them in a boiling pot of water for an allotted amount of time.
Depending on the type of fruit or vegetable you are using, the time varies for processing. The time will depend on the acidity and the size of your food and jars. Don’t worry, you will not have to figure this out on your own. You will be following a recipe that will tell you exactly how long to process.
Water bath canning is used in fruits and veggies that have a high acidity level. For example, pickles:
Pickles are made by combining your vegetable of choice with a vinegar solution, usually with some spices, and salt.
Another simple thing to water bath is jams and jellies. Fruits are high in acidity, therefore, they are safe to water bath.
A Quick Look at Canning Safety Concerns
Just for reference sake, any other plain vegetable, like green beans, potatoes, beets…need to be pressure canned because they do not contain enough acidity to kill all the bacteria that could cause problems in your canning jars. Pressure canning heats the jars until they are extremely pressurized and hot, and then all the bad stuff is properly killed.
The vinegar and acidity protects the water bath canning jars from bad bacteria.
(If you want to can something without a solid recipe, the best rule of thumb is…don’t. Here’s the USDA’s website for canning safety. There is a downloadable guide if you are interested in learning more.)
Have you heard of botulism?
Even though you shouldn’t be scared to begin canning, in my opinion, botulism is a real thing. You need to know what it is and how to prevent it!
Botulism is a very dangerous bacteria that grows in food, in a moist, low oxygen environment… like in a canning jar. The bad bacteria overgrows, and you are left with a very toxic bacteria that can be very harmful to humans. The scary thing about botulism is that sometimes you can’t even tell that it’s contaminated your jars. BUT! There is a sure way to prevent it, so you shouldn’t be afraid.
If you follow directions and use proper canning techniques, you should have zero problems with botulism. The best way to prevent this from happening is using the proper amount of acidity, and very high heat. Which is exactly what we’ll learn to do.
Read this post from the Prairie Homestead for further reading on how botulism works, and why properly canning is perfectly safe for you to do yourself.

A Few More Terms Before We Begin
When you are deciding what to can, it’s important to know some more terms:
Hot pack
Cold pack
When reading a recipe, it will tell you if you are preparing your veggies according to these two methods.
Hot pack is where your all food has been heated, and will be put into the canning jars hot.
Cold pack is where you will take your raw vegetable, and pack it into the jar, then add a liquid, which will be boiling hot.
Back to Water Bath Basics
Ok friends, let’s get back to the basics of water bath canning. We’ve went through the preliminary safety precautions and some vocabulary words…now let’s get to the equipment.
Equipment You Will Need
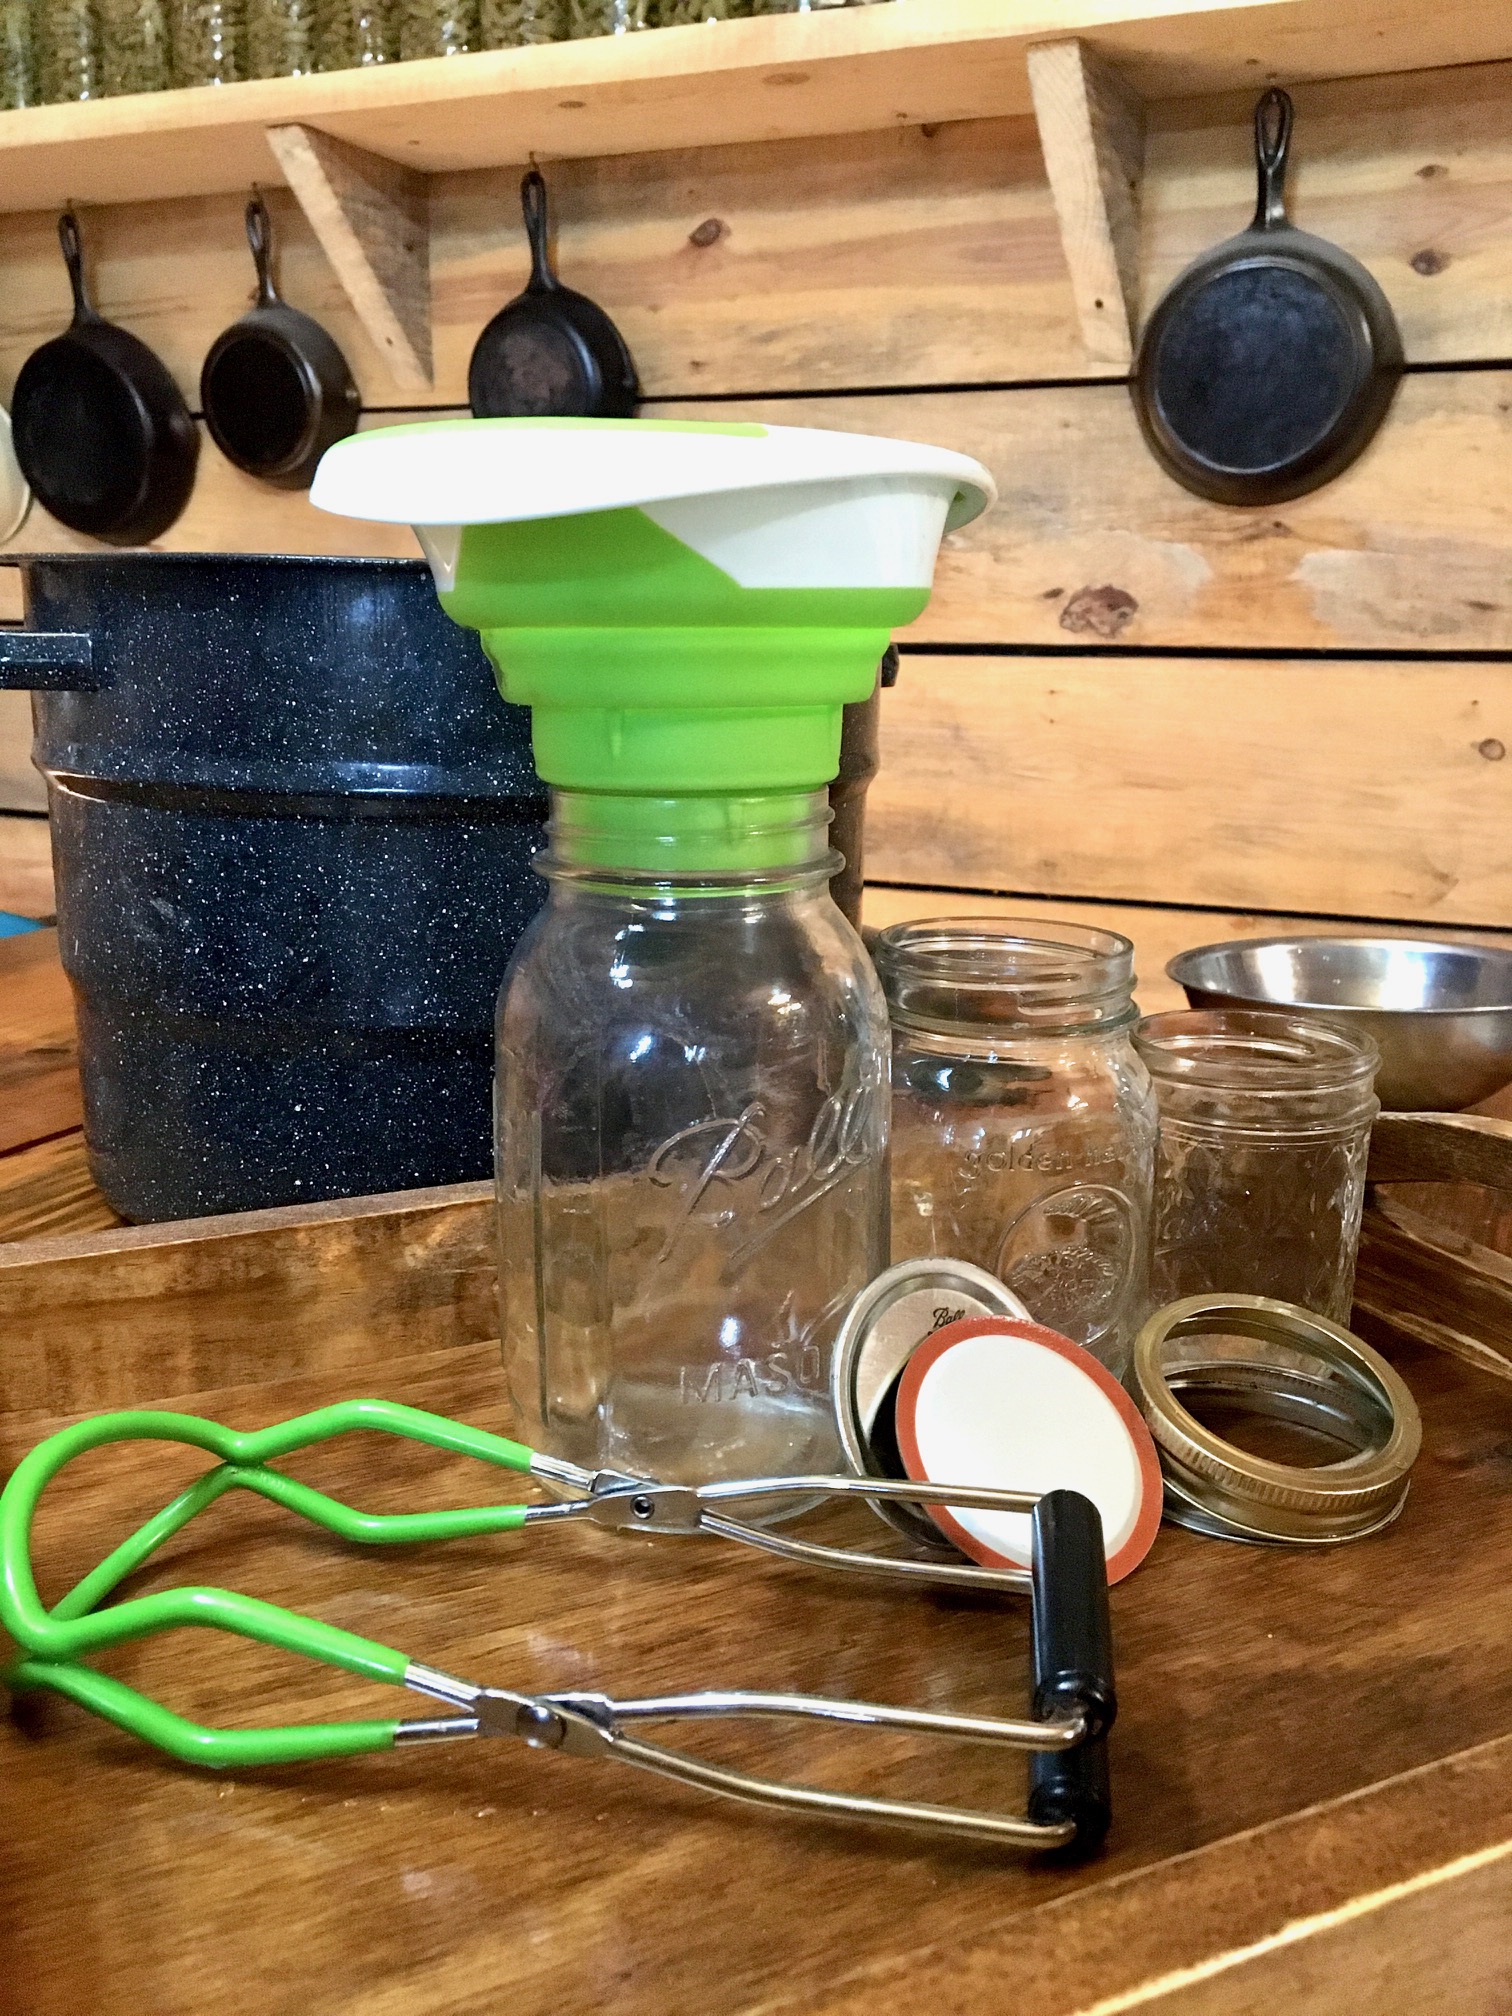
First and most obviously…you will need canning jars, lids, and bands.

You can reuse mason jars year after year, as long as they are free from any nicks or cracks. Always inspect your jars as you are washing them for the first time in hot, soapy water.
You cannot reuse these plastic lids that I have listed. Once they have sealed, they cannot safely be reused to guarantee a good seal. (And like we talked about earlier, to be as safe as possible, we need a good seal!)
You can reuse your bands. Just make sure, like the jars, they are free from any rust or dings that may affect sealing performance.
I usually buy my lids from the grocery store or even from convenience stores.
You will also need the following handy tools to make canning a safe and easy experience:


Water Bath Canner: I’ve linked a 12 quart size. I’ve had great success with this type of water bath pot. It comes with a rack, which is also pretty important.
*(If you do not have a way to buy a water bath canner, you can always use a large, tall, stockpot. Just make sure your jars have plenty of room from the top of the lid to the top of the stockpot (3 inches at least). And you will also need to make sure you have a way to make a rack…this can be done out of canning bands, placed in a circle with some in the middle, too.)

You will also need your recipe, several kitchen towels, however many bowls and stockpots for your particular recipe, a big spoon, possibly a slotted spoon, and the main thing…the food! Also have a butter knife or even a chopstick handy for releasing air bubbles from the jar.
Set Up Your Canning Area
What’s that French word that means to have everything set out and ready to go? Mise en place. (I googled it.)
That’s what you want to happen with your canning station.

First, you want all of your supplies clean. I use hot, soapy water, and make sure everything is completely dry. Canning jars need not be sterilized. I will show you in just a moment what we will do with them. But everything needs to be squeaky clean, free of rust, free of caked on food or anything like that.
Fill the canner with enough water to ensure the jars will be covered, and set it on your stove eye.
I set my funnel and my tongs on a clean kitchen towel, set neatly beside my stove on my counter.
Your work station for chopping veggies will be close as well. Whether it be on your table, your kitchen island, or by your sink, like me.
When I am preparing the food, let’s say I’m making a cold pack pickle for the sake of an example in this tutorial…I will place my clean jars into the water bath canner to heat them up.
Step One: Preparing the Jars
The jars should be submerged in the water in your water bath canner. I will take the jar, dip it into the canner where I have already filled it at least halfway with water, and make sure the jar is filled with water, then I set it in the canner. I repeat with all my canning jars. When all the jars are filled and in the canner, the water should cover all the jars. Turn on the stove.
My canner will fit 12 regular mouth pint sized jars, which is what I will use for my example of cold pack pickles. But regardless of the size, I will always have my jars heating, submerged in the canning water on my stove. While I’m preparing the food, my jars will be heating up.
Step Two: Preparing the Lids and Bands
This step is debatable. I’ll just show you the way I have always prepared my lids and my bands.
First, make sure they are washed with hot, soapy water.
Then, I will take a bowl, usually stainless steel, and dip some of the hot canning water from my canner into it, then submerge the lids and bands into my little bowl. They are not being boiled or sterilized, just heated.
I have heard that at least heating them will help seal. Like I said, this is evidently debatable.
I let them sit in the hot water until ready to put on the jars.

Step Three: The Food
Now it depends on what you are making, really. If you are making a cold pack pickle like I am using for example’s sake, you will have your veggies chopped and ready to go. You will have your brine, your vinegar, water, and spice mixture heated to a boil.

If you are making jam, you will have a pot full of hot fruit to spoon into your jars.
You will always want to prepare fresh produce. If it is about to mold, probably don’t want to can it. The results may not be the best looking or best tasting. But honestly, I have went ahead and preserved some almost too far gone tomatoes, and it’s been fine. I hate to think I wasted them. But because this is a tutorial…just use fresh produce!
It all depends on your recipe. Sometimes, you will just pack a whole pod of okra into a jar, get them all lined up nice and pretty, then pour the brine over them. That’s it.
Other times, for relish, you will let the mixture of various veggies sit overnight in salt, then you may have to drain them and rinse, then pack into jars, heated or covered in hot brine.
Jam and jellies you will spoon straight into the jar.
Just pay attention to your recipe and everything will be just fine.
Headspace: Majorly Important Detail
As you are reading and following your trusted recipe, there will always be a recommended headspace.
This means that you will need to measure (usually in inches) from the top of your food contents to the top of the jar.
The amount of headspace is important because while the food is being heated, it needs space! It might explode!
Or it will not seal properly. Or your liquid will seep out and the food will not be covered and it will turn black. (Can you tell maybe I’ve not obeyed the headspace rule before?)
Step Four: Filling and Processing
It’s go time now! Let’s fill the jars full of your delicious creation!
According to your recipe, as we discussed above, you will fill your jars.
Lift each empty jar that has been in the canner with your canning tongs, and dump the water back into the canner. Don’t burn yourself!


Set the piping hot jar on a towel, and then fill the jar however your recipe says to. (Remember to have all your supplies in place so you won’t be reaching over hot jars and risk knocking something over.)
Now, you will always need to run a thin knife, or even a chopstick around the sides of the jar to allow any air bubbles to escape. It’s not necessary to get extremely fussy about this, just work your stick around the edges, and that is going to be good enough.
Then, take a paper towel or a clean kitchen towel and wipe the rim of the jar clean. Make sure no food or liquid is on the rim, because it could negatively affect the seal.
Once the rim is wiped, get one of your lids out of the bowl we set aside earlier, and place it on the jar.
Then grab a band, and screw it on the jar, only to fingertip tightness. No need to make it super duper tight. I always tighten until I can feel it resist. I do not forcefully secure the band. No need for it.
Once the bands are on, your jar is most likely hot, so use the canning tongs to lift the jar without tipping it, and place it directly into the water bath that is at, or near, a boil at this point.
*Be Careful! It’s going to be hot!*
Step Five: Processing
Now all of your jars are filled, secured with lids and bands, and set back into the hot water. (Make sure that your jars are covered by the water. If you need to add more, do so.)

I will put my lid on my canner, and crank up the heat. Depending on how long your water has been heating, you will watch for it to come to a rolling boil. Once it is at a boil, you will set your timer.
Your recipe will tell you how long you will need to process your jars. Set the timer according to your recipe.
Keep the canner at a steady boil. I usually end up turning my stove eye down a little, as long as I can keep my water rolling. I can tell by the sound that it has remained boiling.
When your timer goes off, turn off the stove.
The Final Step: Removing and Storing the Jars
Give the canner five minutes to calm down from its boil.
Remove the lid, carefully. Set it aside.
Using your canning tongs, carefully lift the jars out of the water. Be sure not to tip them! Keep them upright.
Set them on your counter where a towel has been set. Remove all the jars this way.
Now…admire your beautiful jars!
My favorite part of the whole canning process is seeing how pretty the jars look. I also like this part…
The seal.
There will be a “pop” of all the jars to let you know that they have sealed. I like listening to hear them seal one by one. It’s kinda fun! The jars are telling me good job, haha!
Now, I will usually leave the jars sitting overnight, or until completely cool. Then, they can be moved to their permanent home on the canning shelf.
Clean up, congratulate yourself, and enjoy your hard work!
Other Resources
I’m going to include some more resources that I have found helpful over the years:
Put Em Up by Sheri Brooks Vinton
This book has been loved to death. It was my first canning book. I learned my whole process from this book! She not only covers water bath canning, but also other methods of preservation like freezing and dehydrating. Her recipes have never failed me. Highly recommend!
Preserving Everything by Leda Meredith
I bought a copy of this book after I had been canning for a few years. It definitely helped expand my repertoire, and helped me along my pressure canning journey. She has instructions for nearly everything you could possibly think of. Love it!
The Prairie Homestead Canning section
Basically anything you need to know, Jill has never disappointed. Check out her blog articles. She is a trusted source.
I personally have not read the Ball Blue Book Guide, but I know that many consider it the canning bible. I’ll link it here in case you want to read it for yourself!
Happy Canning!
I hope my tutorial helps you get started canning in the easiest way possible! Please reach out with any questions. I’ll be happy to answer them.
Ready to try an easy recipe? Check out Old-Fashioned Strawberry Preserves


