How to Make Simple Soy Wax Candles
I want to clear something up real quick before ya’ll read this tutorial.
I’m no expert candle maker. I don’t have the patience to learn all the different techniques that’s involved with “real” candlemaking.
But if you want a quick, cute, unique gift…this is a winner!
Friends will think you have some secret candle-making talent when you bring these out.

Before you get started, have these materials gathered:
–Soy wax (I use this kind, ordered straight from Amazon. This is my affiliate link, so if you purchase any from this link, I will get a small credit. All links on this post are affiliate links, just so you are aware.)
-Crock pot. I use an old hand-me-down that is retired from cooking food. I also use it to make soap.
-Candle scent, if desired. The possibilities are fun and endless!
–Candle wick. I prefer these. You can purchase any old wick from Hobby Lobby, but the ones that are pre-dipped in wax burn better, in my experience.
-Container of choice. This is so fun. Choosing a non-porous container, whether it be a glass jar or tea cup, is where your creativity can shine! I love shopping for China cups or unique glassware at second hand stores. They are extremely cheap. And you never know what you will find at such a place! If you can’t find anything in Goodwill, you can always choose the 4 oz Mason jar. They even make them in different shapes if you’re willing to pay a little extra. Look for fun containers at garage sales, too!
Here’s the process:
1. Fill your candle container with the soy wax pieces. I fill them up to the top, as the wax will melt and you’ll have to add more.


2. Put all the filled containers in the crockpot. The size of your crock—and the containers—will determine how many candles you can do in one batch.
3. Add water slowly to the crockpot, around your containers. Make sure there is enough fill water to warm the containers to melt the wax, but not so high that the water sloshes into the candles, or the containers float!
4. Set the crockpot on high, and let the wax melt.
5. Depending on the strength of your crockpot, it will be at least an hour before your wax melts completely. However, it doesn’t have to be completely melted for you to add more wax to the containers. Just keep adding the wax until it is all the way melted, and you have filled your container to the desired fullness. Obviously, you don’t want the wax to be all the way to the top of your container. That’s just asking for spills, and that will burn you! So use discretion, and don’t overfill the container with wax. You will know how much to add by looking at it as it melts.


6. After the wax has melted and is filled to a reasonable height…turn off the crockpot.
7. You don’t have to work so quickly that you are sloppy…but working fairly quickly…put on heat proof gloves or oven mitts of some kind and carefully take the candles out of the hot crock pot. If you have canning tongs, use those on circle jars or tea cups. I have had odd shaped containers that make using canning tongs more dangerous.
8. Set them on a heat proof surface. I set them on my oven. (I made a boo-boo once and set them on one of my kitchen towels. I had some leakage…and nearly ruined my towel. When that wax melts it is nearly impossible to clean it out of a towel!)
9. Quickly position the wick in the candle. This is the hardest part for me. I usually end up taking long skewers, and wrapping the wick around it to stabilize it in the center. Then I set it on top of the candle until the wax hardens.

10. While the wax is still melted, add the scent. It really depends on your brand of scent…but I add about 15-20 drops. I honestly haven’t experimented with too many essential oils, but I have heard that the heat from the hot wax makes the essential oils evaporate. Feel free to experiment, because that’s how we figure things out! 😉

11. Allow the candles to sit undisturbed for several hours until the wax has completely cooled. Keep them away from children who like to put their fingers in them, thereby ruining the smooth surface of the wax…
12. That’s it! You have a hand-made, beautiful gift or party favor for your friends and family!
Further ideas:
My mama and I hosted a ladies’ brunch recently and I made candles for all the girls. Since it was kind of a tea party, I wanted to find lovely China cups, but I struck out and didn’t find any. So I found some neat little galvanized containers at Hobby Lobby. I thought these would be perfect! They did turn out well…but I had a few leaks in the containers! So be mindful of that when choosing the container. It was a mess and I had to redo a few….but in the end it turned out ok!
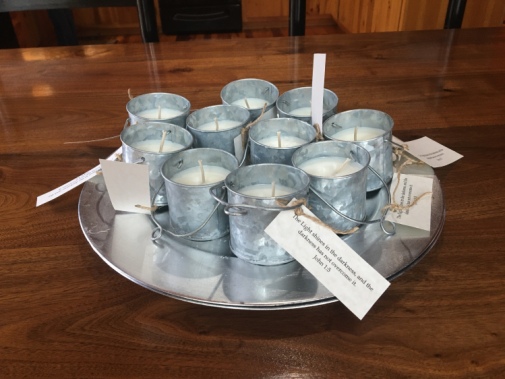
I added a small piece of paper with a Bible verse printed on it and twine around the candle, and ta-da!
You can decorate the exterior of the candle however you choose. The possibilities of ribbon and lace and attachments are literally endless. Remember it is a candle though. So don’t get too carried away and create a fire hazard!

There are so many other candle wax options out there, too. I chose soy wax because it is easy and clean. But you can go to any craft store and find candle wax options.
I have used beeswax before. I love beeswax of course, but it is really messy! Have a dedicated beeswax melting pot! That stuff sticks like crazy when it dries. I have heard of rolling beeswax candles, but I haven’t tried it.
Like I said when we started, I would never claim to be a candle making expert. But I love showing up with cute homemade gifts. Plus making soy candles is a fun skill to have under your belt.


