A Quick Guide to Raising Chicks
People, we have a problem at our house. In the springtime, if there are chicks for sale at our local Co-Op or Rural King, we will be coming home with a box full of them. It’s impossible for us to resist buying more poultry each year. Last year it was guineas and Cornish roasters, the year before it was turkeys and our Black Australorp chickens. It’s not even April, and now I have twenty new baby Cornish roasters.
My husband can’t help himself when there’s a chick sale. (He better keep me away from the ducks this year…stay tuned.)
Needless to say, over the years he has become a pro at raising chicks.
I have to stop and tell you about our chicken brooder. This is where we keep the baby chicks. My husband and his Grandpa John built it together when he was a kid. The top part of the brooder came from a fence his great-grandpa built on their farm. So this little brooder is special.
I don’t know how many groups of chicks and turkeys were raised in the brooder, but it would be dozens. There are two holes in the top for heat lamps. Then the lid can also be lifted for easy feeding/watering.

When the chicks arrive home from the store, or the post office, or whatever, we will already have the brooder prepared.
(This section contains affiliate links, which means if you purchase through my link I may receive a small commission at no extra cost to you. Thank you!)
Preparing The Brooder
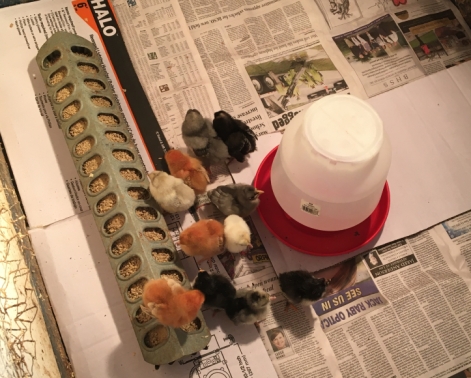
- Put down a bed of newspaper first.
The newspaper bed is laid for little babies because it is easier to change at first, and my husband thinks it is safer for them. After their first week, we lay wood chips down for them.
2. Then, prepare a solution of sugar water. In a quart jar of filtered water, add 2 tablespoons of sugar.
When the chicks come home for the first time, their beaks will be dipped by us into the sugar water so they will know where their water comes from. These waterers are the best for starter chicks. The bottom screws onto a quart mason jar. Once they are individually shown where the water is, they are free to wonder about the brooder.
You will pick up a chick, use your finger to gently guide it’s beak into the water, and you can noticeably tell if the chick gulps the water. Set it back down gently and it will scurry on.
3. Also, have your chick starter feed available for the chicks. We have these types of feeders. We love these and recommend them highly.
4. Chicks need to be warm. Think Mama Hen. We keep the brooder around 98 degrees. We use heat lamps to make sure the temperature is right.

~Keep an eye on them at least twice a day. Sometimes, sadly, a chick will die. If this happens, just remember this is all part of farming, and despite your best efforts—it happens. Most of the time, we never know the reason for losing one. Thankfully, it doesn’t happen too often.
Continuing Care
~The chicks bedding will need to be changed when it is moderately soiled. Chicks poop a lot. Change the bedding at least once a day at first.
~The sugar water will last them a day or two. Then when they drink all in the first batch of water, we just continue to fill it with plain water. (Pro tip: the electrolyte solution they charge you for at the store is basically sugar water. If you want to save money, mix it yourself.)
We use Tennessee Farmer’s Co-Op feeds exclusively. Chick Starter Grower feed is a corn based/soybean meal mixture especially made for babies. We have had great success using this mix.

Pasty Butt
Excuse my language. But this is something you will need to watch out for in your baby chicks. It is known as pasty butt, poopy butt…you get the picture.
It looks like it sounds. There will be manure caked on the little chicks behind. You will have to intervene and help the chick out, or it could possibly die from being clogged. No kidding.
So what you need to do is very simple:
Take a warm wash cloth, and gently massage the chicks bottom until the poop loosens up. DO NOT PULL it off. You could hurt your chick unintentionally. Just gently keep “massaging” and the poop will eventually soften and come right off.
We inevitably have to do this to at least one or two of our chicks. Maybe someone has a solution to prevent this, but we haven’t discovered it yet.
Chickens are Addicting
We’ve had about every breed of chicken there is. We used to order our chicks from private hatcheries. But the past two years we have went through Rural King to order our flock. This has saved us shipping costs. But any local Co-Op, Tractor Supply, or Rural King has oodles of poultry for sale.
When we hear “chirp-chirp” from the front of the store, guess what happens? We leave with some new additions to the farm.
Here on our farm, we seamlessly move from chick, to pullet, to adult. Once they grow out of the brooder, into a small coop, then into the big coop they go.

The Cornish roasters we have now will actually end up in the freezer. I will be sure to write more about this facet of farm life in the future.
Any questions about getting started in chickens? We’re your hook-up. Give us a holler for your questions! As always, thank you readers! May your chicken endeavors be as rewarding as ours have.
Want to up your chick game? Hatch your own with an incubator! Read this post to learn more!
Incubating Chicken Eggs: Start Hatching at Home
For more posts like this, visit the Farm Life section.


Incubating Chicken Eggs: Candling and Hatching – J&R Farms
[…] For the next stage of your chicken’s life, please check out A Quick Guide to Raising Chicks! […]